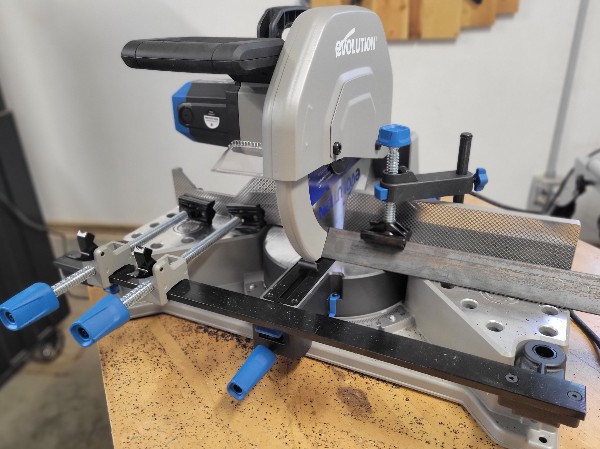
Yes, a miter saw can cut metal, but it typically requires some modifications and the use of the appropriate blade. Miter saws are primarily designed for cutting wood and are equipped with toothed blades designed for that purpose.
To cut metal with a miter saw:
- Use a specialized metal-cutting blade.
- Secure the metal properly.
- Wear safety gear (glasses, hearing protection, gloves).
- Adjust saw settings for the metal type and thickness.
- Make slow, steady cuts.
- Use cutting lubricant or coolant for cooling.
- Be cautious of sparks, especially with ferrous metals.
- Clean up debris after cutting.
What Are the Essential Steps to Cut Metal with a Miter Saw?

Mastering the art of cutting metal with a miter saw requires a series of essential steps to ensure safety and accuracy.
Step-by-step process of cutting metal with a miter saw
Safety First: Put on appropriate safety gear, including safety glasses, hearing protection, and gloves. Additionally, ensure the work area is well-ventilated to disperse metal shavings and fumes.
Select the Right Blade: Choose a specialized metal-cutting blade suitable for the type and thickness of metal you’re cutting. Make sure the blade is securely installed and properly aligned.
Prepare the Workpiece: Measure and mark the metal piece where you want to make the cut. Moreover, secure the metal workpiece firmly to the miter saw’s table using clamps to prevent movement during cutting.
Set the Miter and Bevel Angles: Adjust the miter saw’s settings to the desired angle for the cut. Ensure it’s securely locked in place. If necessary, set the bevel angle to 0 degrees for a straight, perpendicular cut.
Position the Blade: Lower the saw blade down onto the marked cutting line. Ensure the blade is not touching the metal before starting the saw.
Start the Saw: Turn on the miter saw and allow it to reach full speed before making the cut.
Make the Cut: Slowly lower the spinning blade onto the metal workpiece, maintaining a controlled and steady motion. Apply consistent and even pressure throughout the cut. Let the blade do the cutting; avoid forcing it through the metal. Moreover, keep your hands and body clear of the blade path.
Complete the Cut: Once the cut is complete, release the trigger and wait for the blade to come to a complete stop before lifting it from the metal.
Include tips and best practices for achieving clean and accurate cuts
Ensure your metal workpiece is properly secured to prevent vibrations or movement during cutting. Use a slow, steady feed rate to prevent overheating and ensure a cleaner cut.
Make test cuts on scrap metal to fine-tune your cutting technique and adjust the saw settings.
Maintain a firm grip on the miter saw handle and maintain control throughout the cut. Avoid excessive force; let the saw and blade do the work. Keep the blade sharp; a dull blade can cause rough cuts and increase the risk of kickback.
Highlight potential challenges and how to overcome them
- Heat Buildup: Metal cutting generates heat, which can lead to blade dulling and warping. Use a suitable lubricant or coolant, and take breaks between cuts to allow the blade to cool down.
- Burrs and Sharp Edges: Metal cuts may leave burrs and sharp edges. You can deburr the edges with a file or a deburring tool to ensure safety and a clean finish.
- Material Thickness: Thicker metal may require multiple passes to make a clean cut. Take your time and ensure the blade remains in contact with the metal throughout each pass.
- Safety Concerns: Always prioritize safety. Metal cutting can produce sparks and hot metal shavings. Maintain proper safety gear, and work in a well-ventilated area away from flammable materials.
- Blade Maintenance: Regularly inspect and maintain your metal-cutting blade. Clean it of debris and ensure it’s sharp for efficient cutting.
Final Words
In conclusion, mastering the essential steps to cut metal with a miter saw can greatly enhance your metalworking capabilities.
Moreover, by following these steps diligently and with proper safety precautions, you can achieve precise, clean cuts in various metal materials, opening up a world of possibilities for your DIY and professional projects.
